Bastion
AWS Bastion as your Identity Provider#
The AWS Bastion account configuration is the simplest configuration for deploying Figgy across your AWS stack. Deploying a Bastion configuration will provision the following resources across your AWS Accounts.
Resources Provisioned:
Plus some extra resources in your selected Bastion account:
- IAM Users (this is what your Figgy users will authenticate with)
- IAM Roles
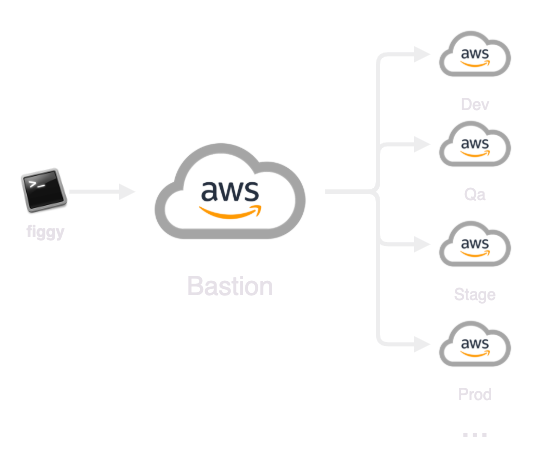
Users will authenticate with your bastion account through some low-power IAM Credentials stored in their ~/.aws/credentials file.
With these credentials and their MFA token (if you enable MFA), users will be able to "hop" into other environments and
interact with Figgy normally.
To simplify user management you may optionally remove all other IAM users and leverage the Figgy provisioned users & roles as a basis for all user authentication across all AWS accounts.
Prep:#
-
First, coalesce a list of accounts you'd like to integrate with Figgy.
-
Second, if one of these accounts is already leveraged as your primary authentication account, select this account to be your bastion. If not, consider creating a new AWS account specifically for the purpose of serving as your AWS SSO bastion account.
-
Next, head over to the Figgy Github Repository. You're going to want to fork this repository and keep your own version. Once you have the repository locally, open it up in your favorite IDE and lets get to selecting options!
-
Change directory into your new forked repository to
figgy/terraform/. This is where all of your Figgy terraform code lives.
To prepare Figgy for deployment you're going to need to tweak four files:
- 00_main.tf
- 01_configure_figgy.tf
- 02_configure_bastion.tf
- vars/{env}.tfvars files
Step 1: Configure Terraform#
Lets' start with 00_main.tf
If you have any familiarity with Terraform this should be a cinch. All you need to do is configure this file as you normally would any other Terraform file. This code base is a Terraform multi-environment codebase; we will be using this same Terraform configuration to deploy Figgy across every account you want to integrate with Figgy. Hard-coding a single profile or access key is probably not a good idea here.
Once your main.tf is configured you should be able to do something like this:
terraform init
terraform workspace new bastion
terraform workspace select bastion
Step 2: Configure Figgy#
Open up your 01_configure_figgy.tf file. There are some important options in here. The comments in the file
should make it fairly clear what each option means. If you get confused, check the reference for clarity.
Be sure to take extra care when mapping up your roles to /namespaces. If you make a typo you're going to experience
issues with Figgy
Step 3: Configure your accounts#
Open up 02_configure_bastion.tf
This file serves as the source of truth for your bastion users. ALL USERS OF FIGGY MUST BE WIRED UP IN THIS FILE.
Remember that list of accounts I asked you to 'coalesce' earlier? Back when you thought, "I'm surprised he used the word coalesce in this context, and why is it italicised?". Yeah, that was intentional, and you remembered. Now grab that list. Here you will need to map each account you want to integrate with Figgy alongside its AWS account id.
Important!
The name you give each account in the map is how your users will reference accounts when running commands like
figgy config get --env dev, so it's a good idea to select short aliases for each environment.
Next, wire up your bastion_users and the roles they should have access to. As you give more users access to Figgy going forward
you will return to this file, add the user, wire up their roles, and then re-run terraform apply
Step 4: Fill out vars/ files#
This step could vary depending on how you use Terraform. These variables may need to be wired up in Terraform Enterprise or elsewhere.
Regardless, if you look in the vars/ directory you will see sample .tfvars files that you will need to fill in. There
will be one .tfvars file for each account you are integrating. If there are extras, delete them.
Don't forget to set create_deploy_bucket = false in 01_configure_figgy.tf, if you're using your own S3 bucket.
You will want to put the appropriate bucket name in each of the vars/* files for each account.
env_alias must match to the environment names you set in your 02_configure_bastion file in the env -> accountId map.
webhook_url is optional, but if you want you can add a Slack webhook url where Figgy can post notifications for configuration changes.
You may want to rename some of these files so they appropriately match your selected environment names.
Deploy Figgy#
The order you deploy these configurations to each account does not matter, but for the sake of this walk-through lets start
with the bastion account.
You'll want to run terraform apply for each environment. Each environment is associated with a vars/env-name.tfvars file.
Here's what a workflow would look like:
terraform init
terraform workspace new bastion
terraform workspace select bastion
terraform apply -var-file=vars/bastion.tfvars
terraform workspace new dev
terraform workspace select dev
terraform plan -var-file=vars/dev.tfvars
terraform apply -var-file=vars/dev.tfvars
terraform workspace new qa
terraform workspace select qa
terraform plan -var-file=vars/qa.tfvars
terraform apply -var-file=vars/qa.tfvars
You get the drift!
Last step, lets login with Figgy!#
Once Figgy is deployed to all the accounts you want to associate it with, we just need to login. Find the account
that you selected as your bastion account. Log-in to that account, and generate an ACCESS KEY and SECRET KEY for
the user you want to try authenticating with. This user should be one of the user names you enumerated in the
02_configure_bastion.tf file.
If you don't have the AWS CLI installed, install it: pip install awscli or brew install awscli
Configure your new access keys as a local AWS profile:
aws configure --profile bastion
Enter your Access Key / Secret Key / Region / etc.
Now run:
figgy --configure
Follow the prompts. When you are prompted to enter your AWS profile, put in bastion (or whatever you used in the previous command under --profile)
That's it, Figgy is installed and you're good-to-go! Try running figgy config get to verify everything works as expected.