Google as your Identity Provider#
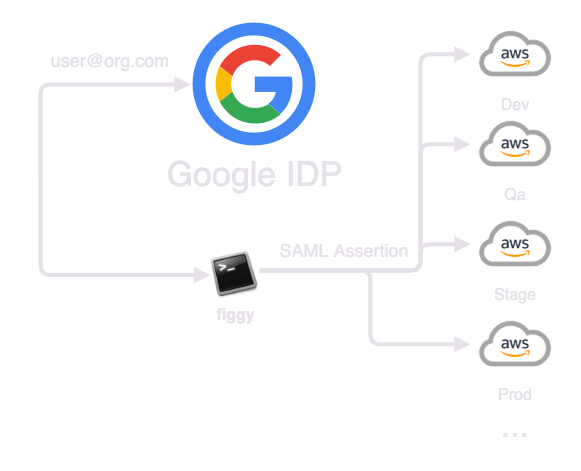
Figgy can help you integrate your accounts with the Google Admin Console. If your company uses Gmail you can feel confident this integration will work for you. This guide will walk you through setting Google up as an identity provider for your AWS accounts. When complete, users will be able to authenticate with your AWS accounts via their Google credentials.
With this configuration you will have 0 users provisioned in your AWS accounts. Instead all access will be provided through AWS Account Federation and a trust configured between your AWS accounts and your Google account.
This is an advanced installation and will take a couple hours in total. Grab a snack.
Resources Provisioned:
Authentication Flow:
If you have already configured Federated Access to AWS through Google you can SKIP step #2
1. Fork Figgy.#
Header over to Figgy Github Repository.
You're going to want to fork this repository and keep your own version. Once you have the repository locally,
go ahead and change directory to figgy/terraform/ in your new forked repository. This is where all of your Figgy terraform
code lives. Take note of the saml/metadata.xml.placeholder file. It's here in GITHUB.
2. Prep Google Admin Console#
Add custom attributes to users#
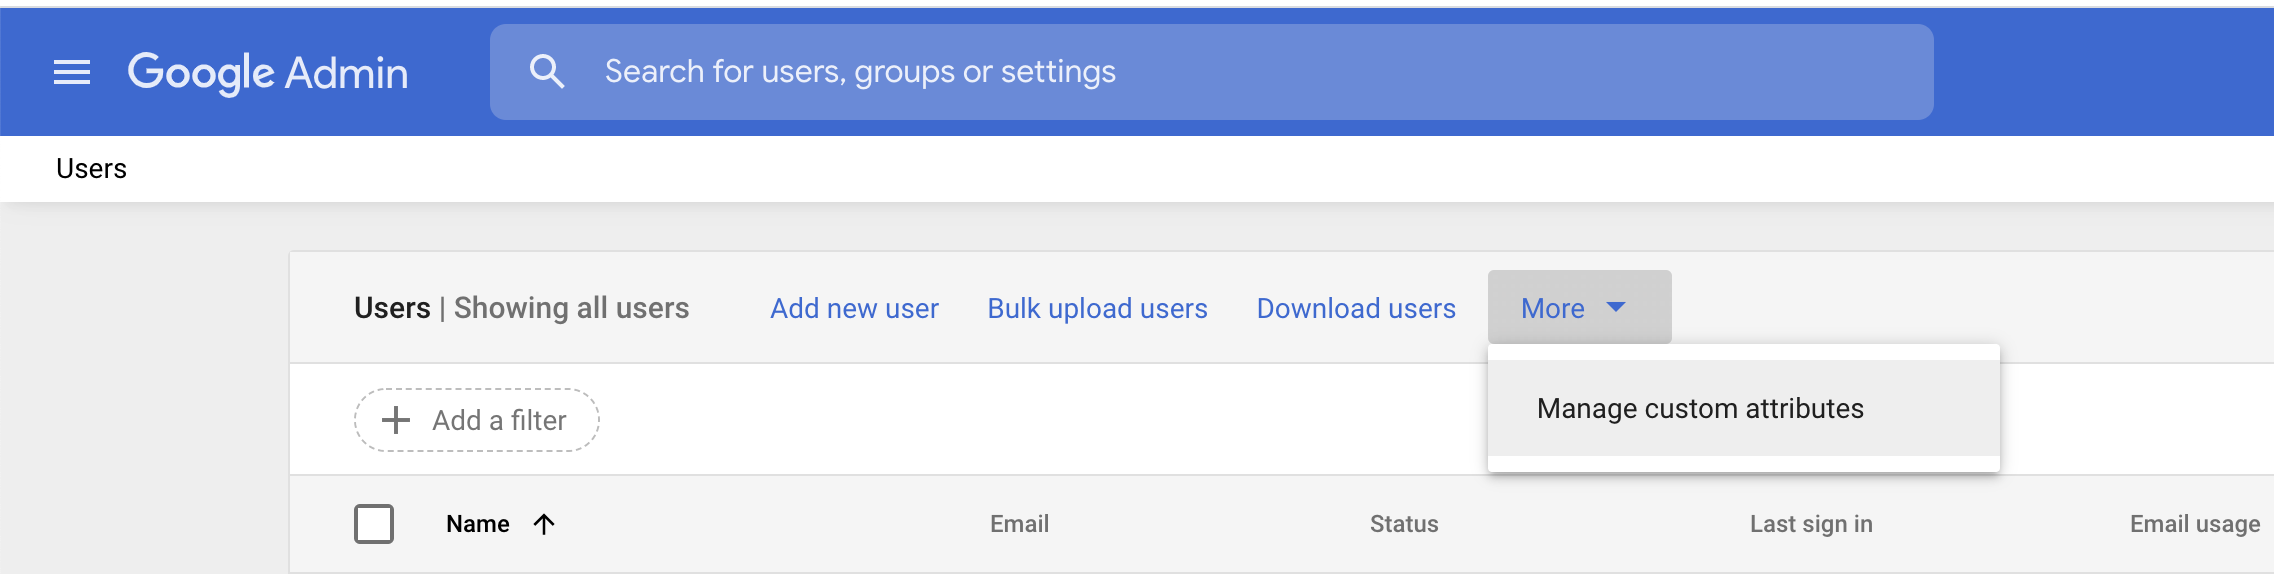
- Log-in to Google Admin Console
- Hamburger Menu (Top Left) → Directory → Users
-
Click More(v) → Manage Custom Attributes
-
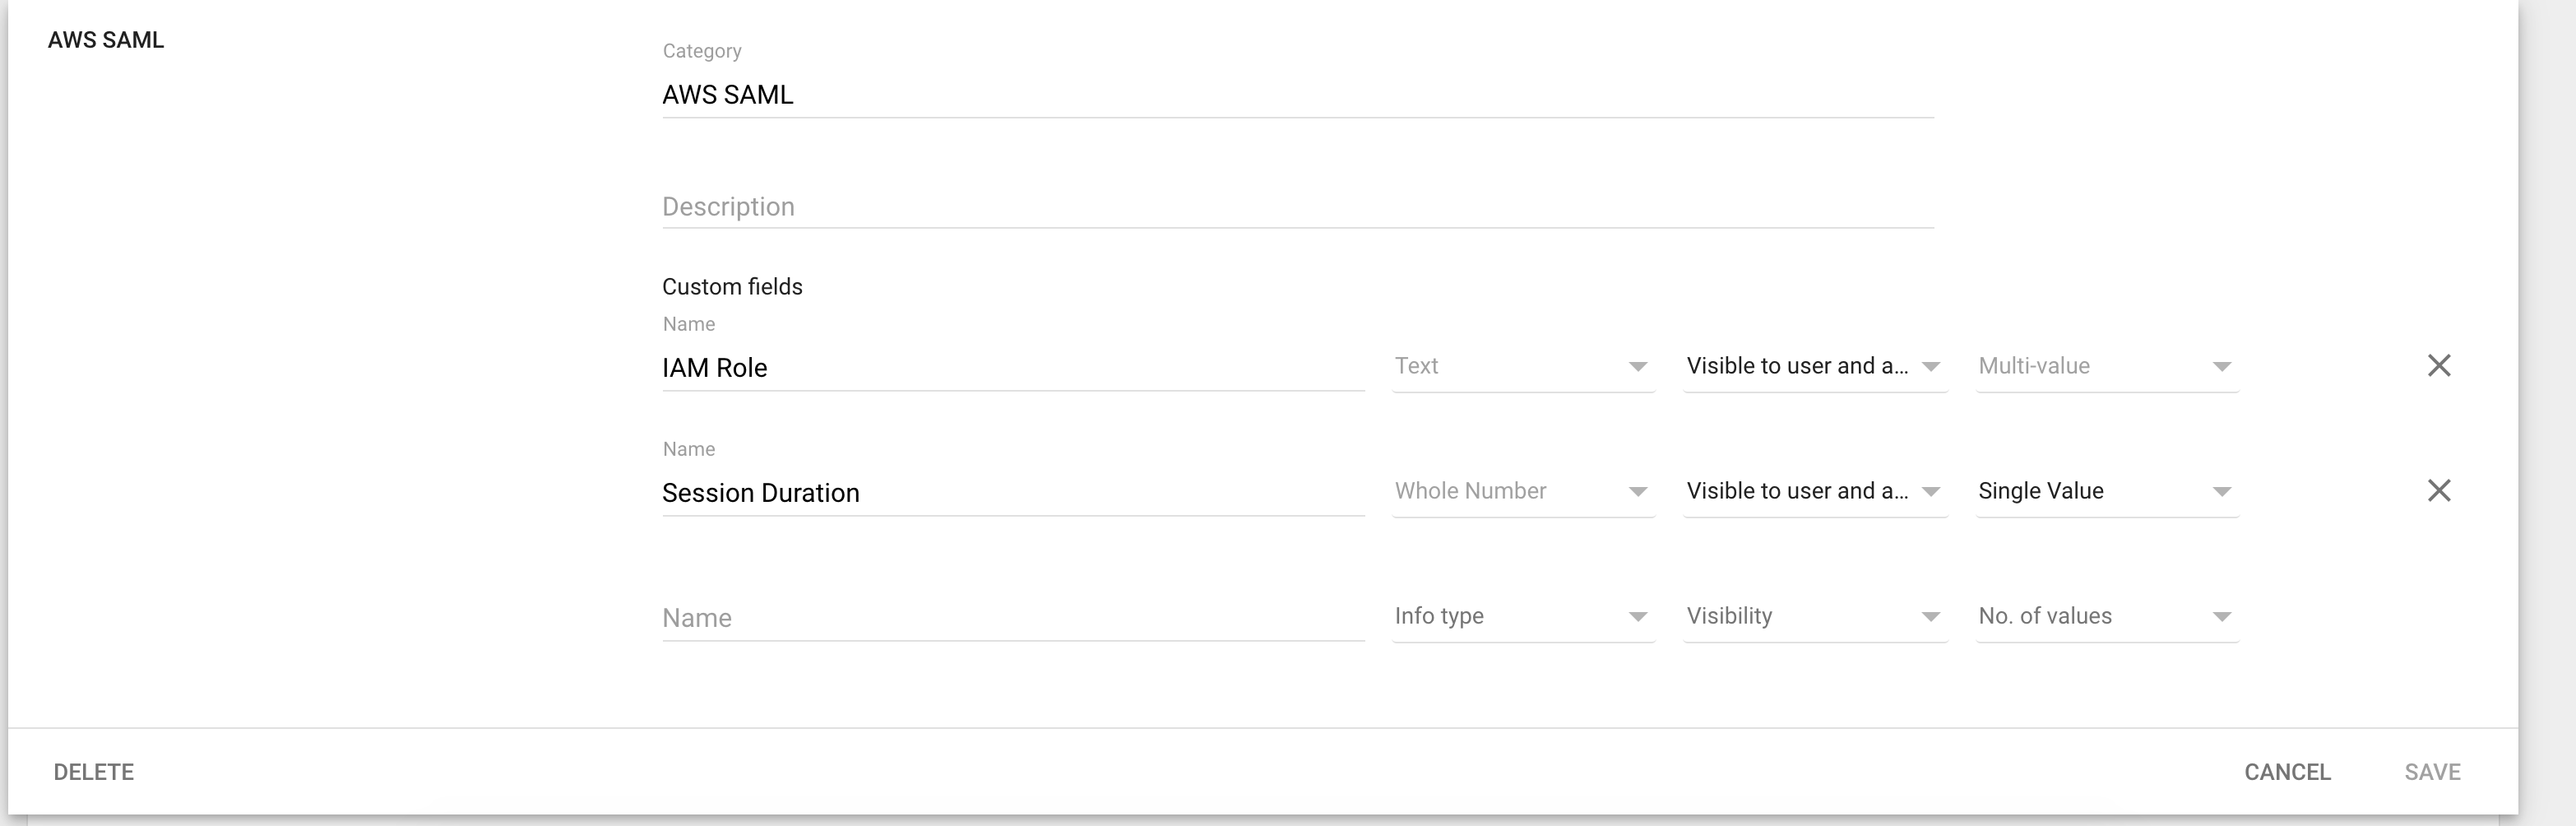
Add the following attributes:
| Name | Info Type | Visibility | No. of values |
|---|---|---|---|
| IAM Role | Text | Visible to user and admin | Multi-value |
| Session Duration | Whole Number | Visible to user and admin | Single Value |
 1. Click Save.
Configure AWS SAML Application#
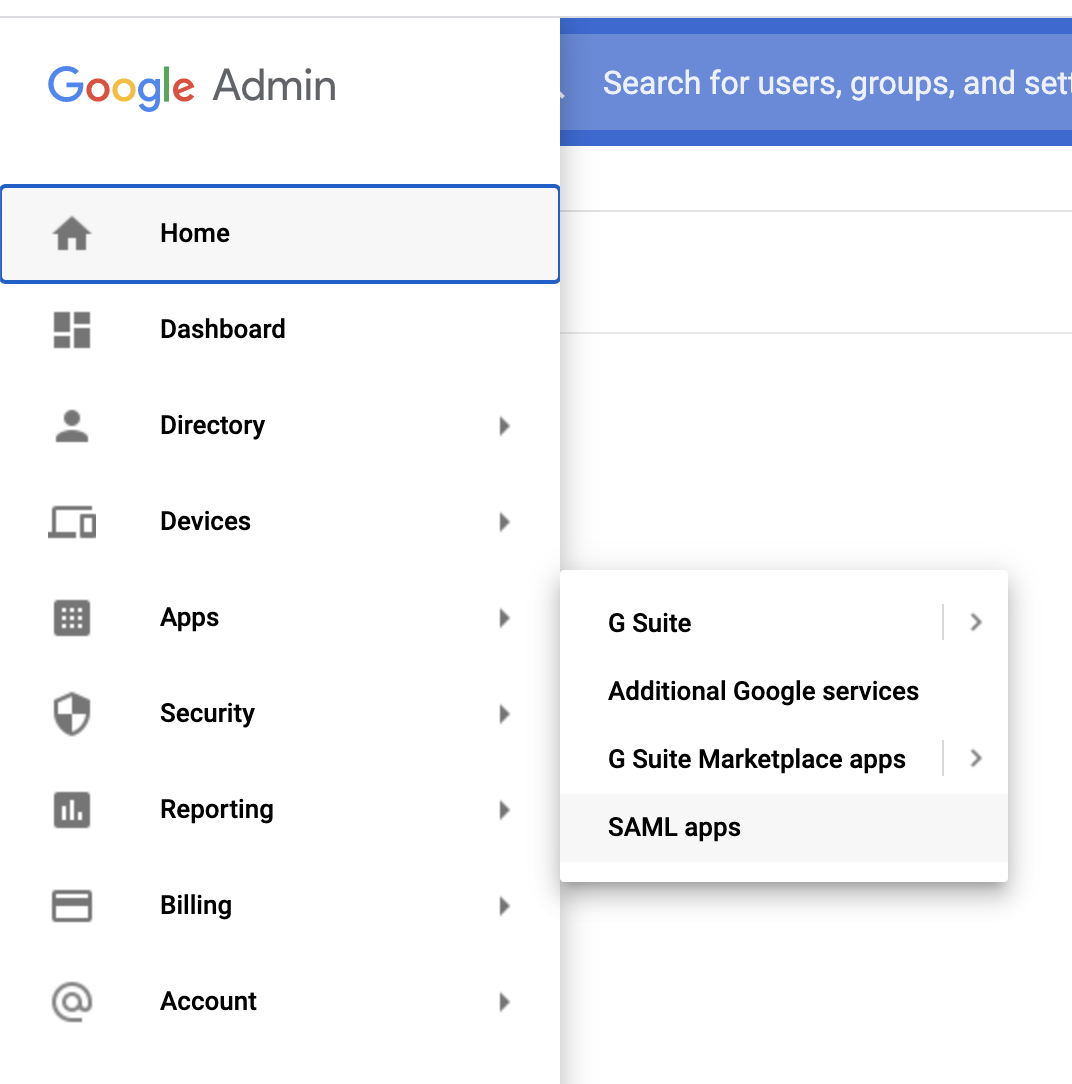
- Open Hamburger Menu (Top Left) → Apps → SAML apps
- Click (+) in bottom right corner of screen.
- Search:
Amazon Web Services& select the only option. - Under SSO URL → Copy the IDP ID from the URL:
https://accounts.google.com/o/saml2/idp/idpid=[CAPTURE_THIS]- This is your Identity Provider Id. Set the IDP ID aside and save it, you will need it later.
- Download the IDP Metadata (Option #2), save it into your
figgy/terraform/figgy/saml/directory asmetadata.xml - Click Next until you get to
Attribute Mapping. - Attribute Mapping: Click
ADD NEW MAPPING - Make sure these three attributes exist. The first 2 should be partially filled in already:
| Attribute | Category | Value |
|---|---|---|
| https://aws.amazon.com/SAML/Attributes/Role* | Basic Information | Primary Email |
| https://aws.amazon.com/SAML/Attributes/RoleSessionName* | AWS SAML | IAM Role |
| https://aws.amazon.com/SAML/Attributes/SessionDuration | AWS SAML | Session Duration |
- Click Finish.
- On the right side in your app's new options menu click (...) and select
ON for everyone.
Open your new application, click Attribute Mapping, you should see something like this:

With your new SAML Application open, look in your URL bar:
https://admin.google.com/your-company.com/AdminHome?hl=en#AppDetails:service=SOME_NUMBER_HERE
SOME_NUMBER_HERE number is your Service Provider Id. Copy it, save it. We will need it later.
3. Configure Figgy#
To prepare Figgy for deployment you're going to need to these files:
Files are located in REPO_ROOT/terraform/figgy/ directory.
- 00_main.tf
- 01_configure_figgy.tf
- vars/{env}.tfvars files
Configure Terraform#
If you have any familiarity with Terraform this should be a cinch. All you need to do is configure this file
as you normally would any other Terraform main.tf file. One important distinction is that this code base is a Terraform
multi-environment codebase. We will be using this same Terraform configuration to deploy Figgy Cloud to
every AWS account you want to integrate with Figgy. Keep in mind -- hard-coding a single profile or access key is
probably not a good idea.
Once your main.tf is configured you should be able to do something like this:
terraform init
terraform workspace new dev
terraform workspace select dev
Configure Figgy#
Open up your 01_configure_figgy.tf file. There are some important options in here. The comments in the file
should make it fairly clear what each option means. If you need more clarity, see our
configuration reference
Once you have selected your Figgy role types, copy those types and set them aside. The default role types can be found below. You can create as many role types as you like and name them however you want.
role_types = ["devops", "data", "dba", "sre", "dev"]
Don't forget to set:
auth_type = "google"
Next, look in your vars/ directory. There are some *.tfvars files already in this directory that can serve as a template.
You will need 1 var file configured for each account you wish to deploy to. If you are using Terraform Cloud or
remote variable storage, you will not need these files and will know what to do here.
Don't forget to set create_deploy_bucket = false in 01_configure_figgy.tf, if you're using your own bucket. You will want to put the appropriate bucket name in each of the vars/* files for each account.
env_alias
This is the environment name users will be referencing your account by when running commands like
figgy config get --env dev, so it's a good idea to select short aliases for each environment.
webhook_url is optional, but if you want you can add a Slack webhook url where Figgy can post notifications for configuration changes.
You may want to rename some of these files so they appropriately match your selected environment aliases.
4. Deploy Figgy#
The order you deploy these configurations to each account does not matter, but for the sake of this walk-through lets start
with the dev account.
You'll want to run terraform apply for each environment. Each environment is associated with a vars/env-name.tfvars file.
Here's what a workflow would look like:
terraform init
terraform workspace new dev
terraform workspace select dev
terraform apply -var-file=vars/dev.tfvars
terraform workspace new qa
terraform workspace select qa
terraform plan -var-file=vars/qa.tfvars
terraform apply -var-file=vars/qa.tfvars
terraform workspace new stage
terraform workspace select stage
terraform plan -var-file=vars/stage.tfvars
terraform apply -var-file=vars/stage.tfvars
You get the drift!
For each deployed account, you will see a new "Identity Provider" show up with the name of 'google':
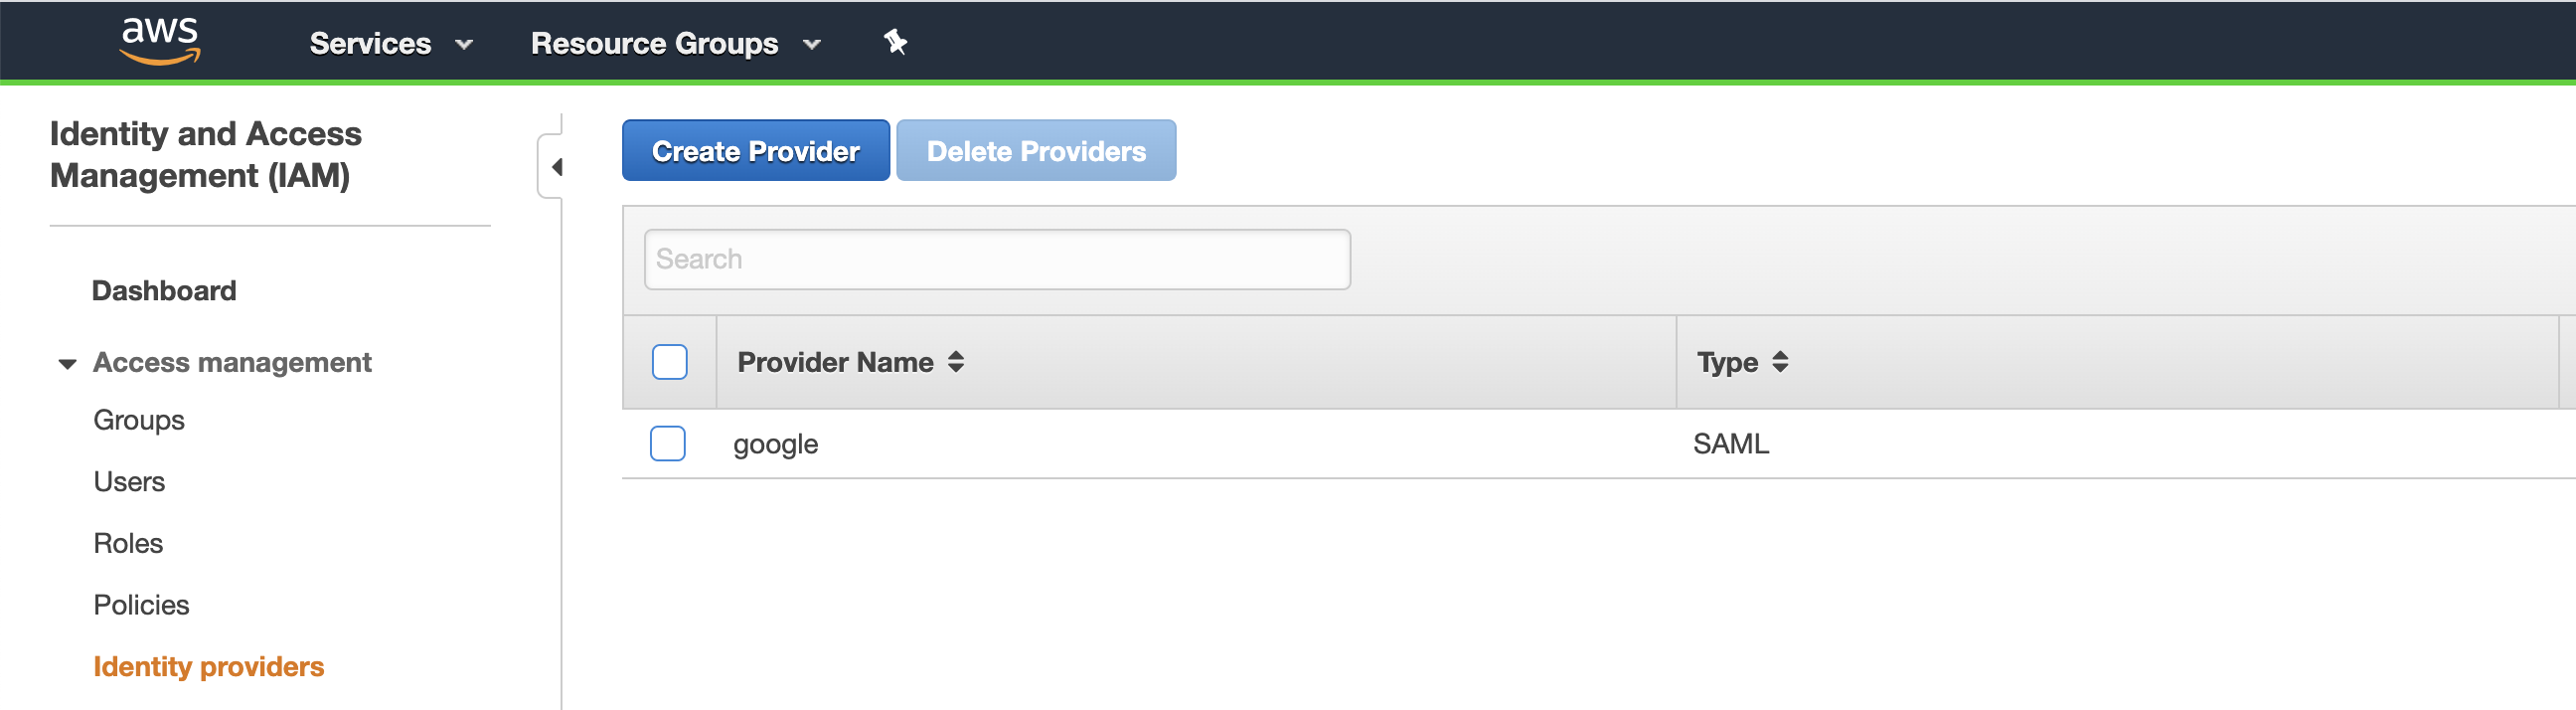
This establishes a trust with Google based on the metadata file you downloaded.
5. Grant User Permissions#
- Head back over to your Google Admin Console → Directory → Users.
- Find & Open your user.
- User Information → AWS SAML (This is the custom attribute you added earlier).
The AWS SAML Attribute is used to provide the selected user access to various mapped-up accounts. The following input
will depend on how you named your figgy role-types in 01_configure_figgy.tf.
The template you will need to follow is this:
arn:aws:iam::${AWS_ACCOUNT_ID}:role/figgy-${RUN_ENV}-${ROLE_NAME},arn:aws:iam::${AWS_ACCOUNT_ID}:saml-provider/google
Replace:
- AWS_ACCOUNT_ID → Account ID for the Target Account
- ENV_NAME →
var.env_aliasyou selected when you filled in afiggy/terraform/figgy/vars/*.tfvarsfiles. - ROLE_NAME → The name of the role you want to allow the user to assume.
Suppose one of your roles is named devops, one of your environments is named dev, and dev is associated with an accountId of 0123456789101
Input this:
arn:aws:iam::0123456789101:role/figgy-dev-devops,arn:aws:iam::0123456789101:saml-provider/google
You can repeat this attribute as many times as you want to give your user access to many different roles across many different accounts.
Done! Now lets use the Figgy CLI!
6. Setup Figgy CLI#
By now you should have already installed the Figgy CLI. Before you get started, make sure you have these two things handy from previous steps.
- Identity Provider Id
- Service Provider ID
Configuring your CLI is as simple as running
figgy --configure
Follow the prompts - read carefully. You will be prompted to input your Identity Provider ID and Service Provider Id.
figgy config get
Roll it out to more people#
Now that you have your Identity Provider Id and Service Provider ID, you can set these in a generic Figgy config file and distribute it to all of your users. This will save them the trouble of having to manage these two ids.
To do this, see Distributing Figgy