Okta
Okta as your Identity Provider#
OKTA is an industry leading Identity Provider with support for Federated authentication across hundreds of services, including AWS.
Figgy leverages the standard OKTA AWS Application and requires minimal extra configuration. We strongly recommend you select Connect OKTA to multiple Amazon Web Services Instances as the single-account alternative has not been tested.
Although this process is well documented in the OKTA documentation, which can serve as a great reference, we will walk you through the entire integration process here. We are assuming you are starting from an OKTA account that has not already been integrated with AWS. If you have already integrated OKTA with AWS, you can skip parts 2, 5, and 6.
This is an advanced installation and will take a minimum of 2-3 hours
Step 1: Fork Figgy#
- Make a private fork of Figgy and clone it locally.
- Take notice of the figgy/terraform/saml directory. You will need to place a file here shortly.
Step 2: Add the AWS App to Okta#
- Go to your OKTA Apps page:
https://${YOUR_ORG}.okta.com/admin/apps/active - Click Add Application
- Click Apps (left sidebar) & search for the
AWS Account Federationapp. Add it. - Select a name / default login URL. The defaults are fine here.
- Click Next
-
Under (2) Sign-On Options
- Select SAML 2.0 if it is not selected (it should be already selected)
- Download your IDP metadata.xml file. Right click the
Identity Provider metadatalink and download the contents. - Store this in the
figgy/terraform/saml/directory and named asmetadata.xml
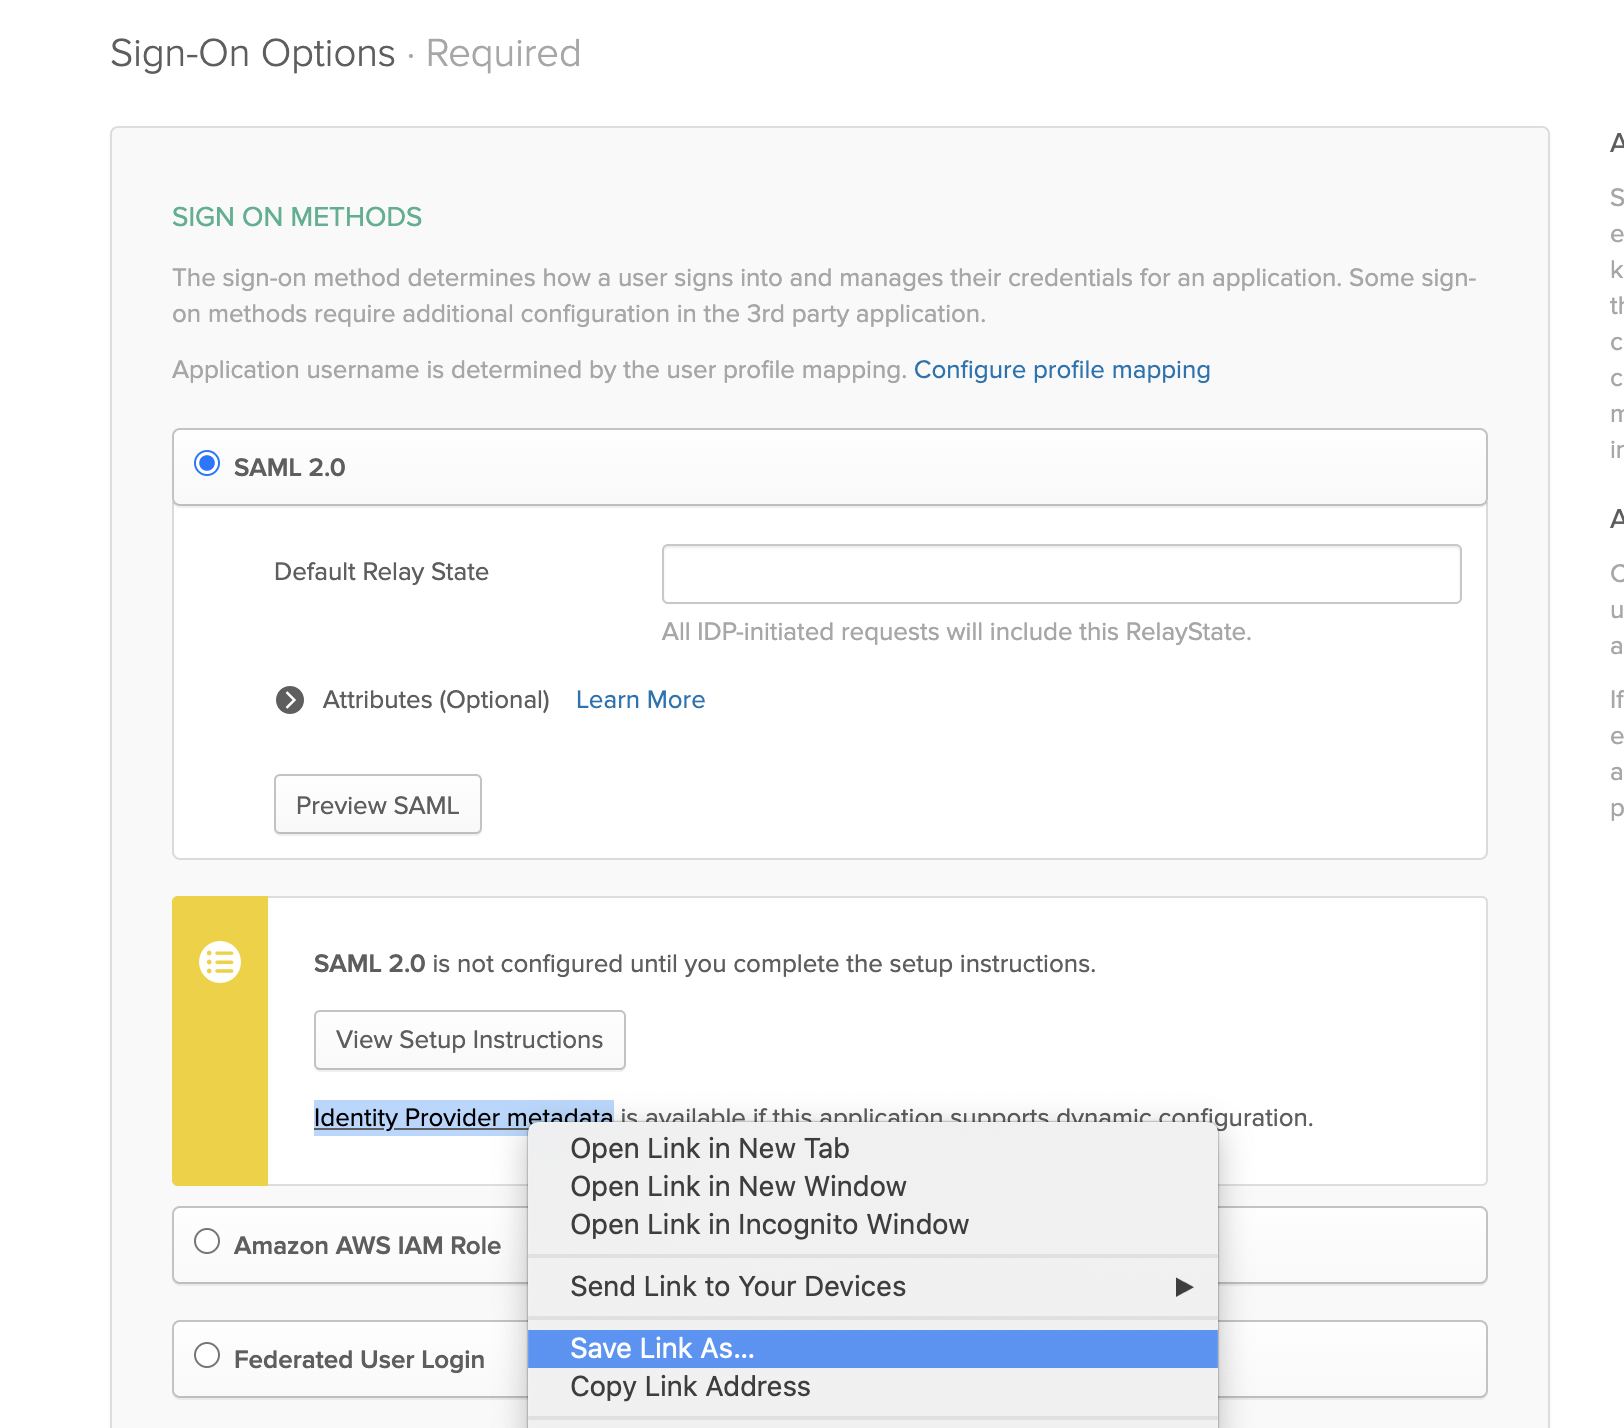
- Under Session Duration, input a max duration up to
43200(recommended) - Check
Use Group Mappingbox. This will reveal some new options. - Under
Group Filter, input:aws_(?{{accountid}}\d+)_(?{{role}}[a-zA-Z0-9+=,.@\-_]+) - Under
Role Value Pattern, input:arn:aws:iam::${accountid}:saml-provider/okta,arn:aws:iam::${accountid}:role/${role}(noticeoktais lower-case here, this is different than the default) - Under
App Filter- select the appropriate application to fetch groups from. If you manage your users/groups in OKTA, inputokta.
-
Click Done
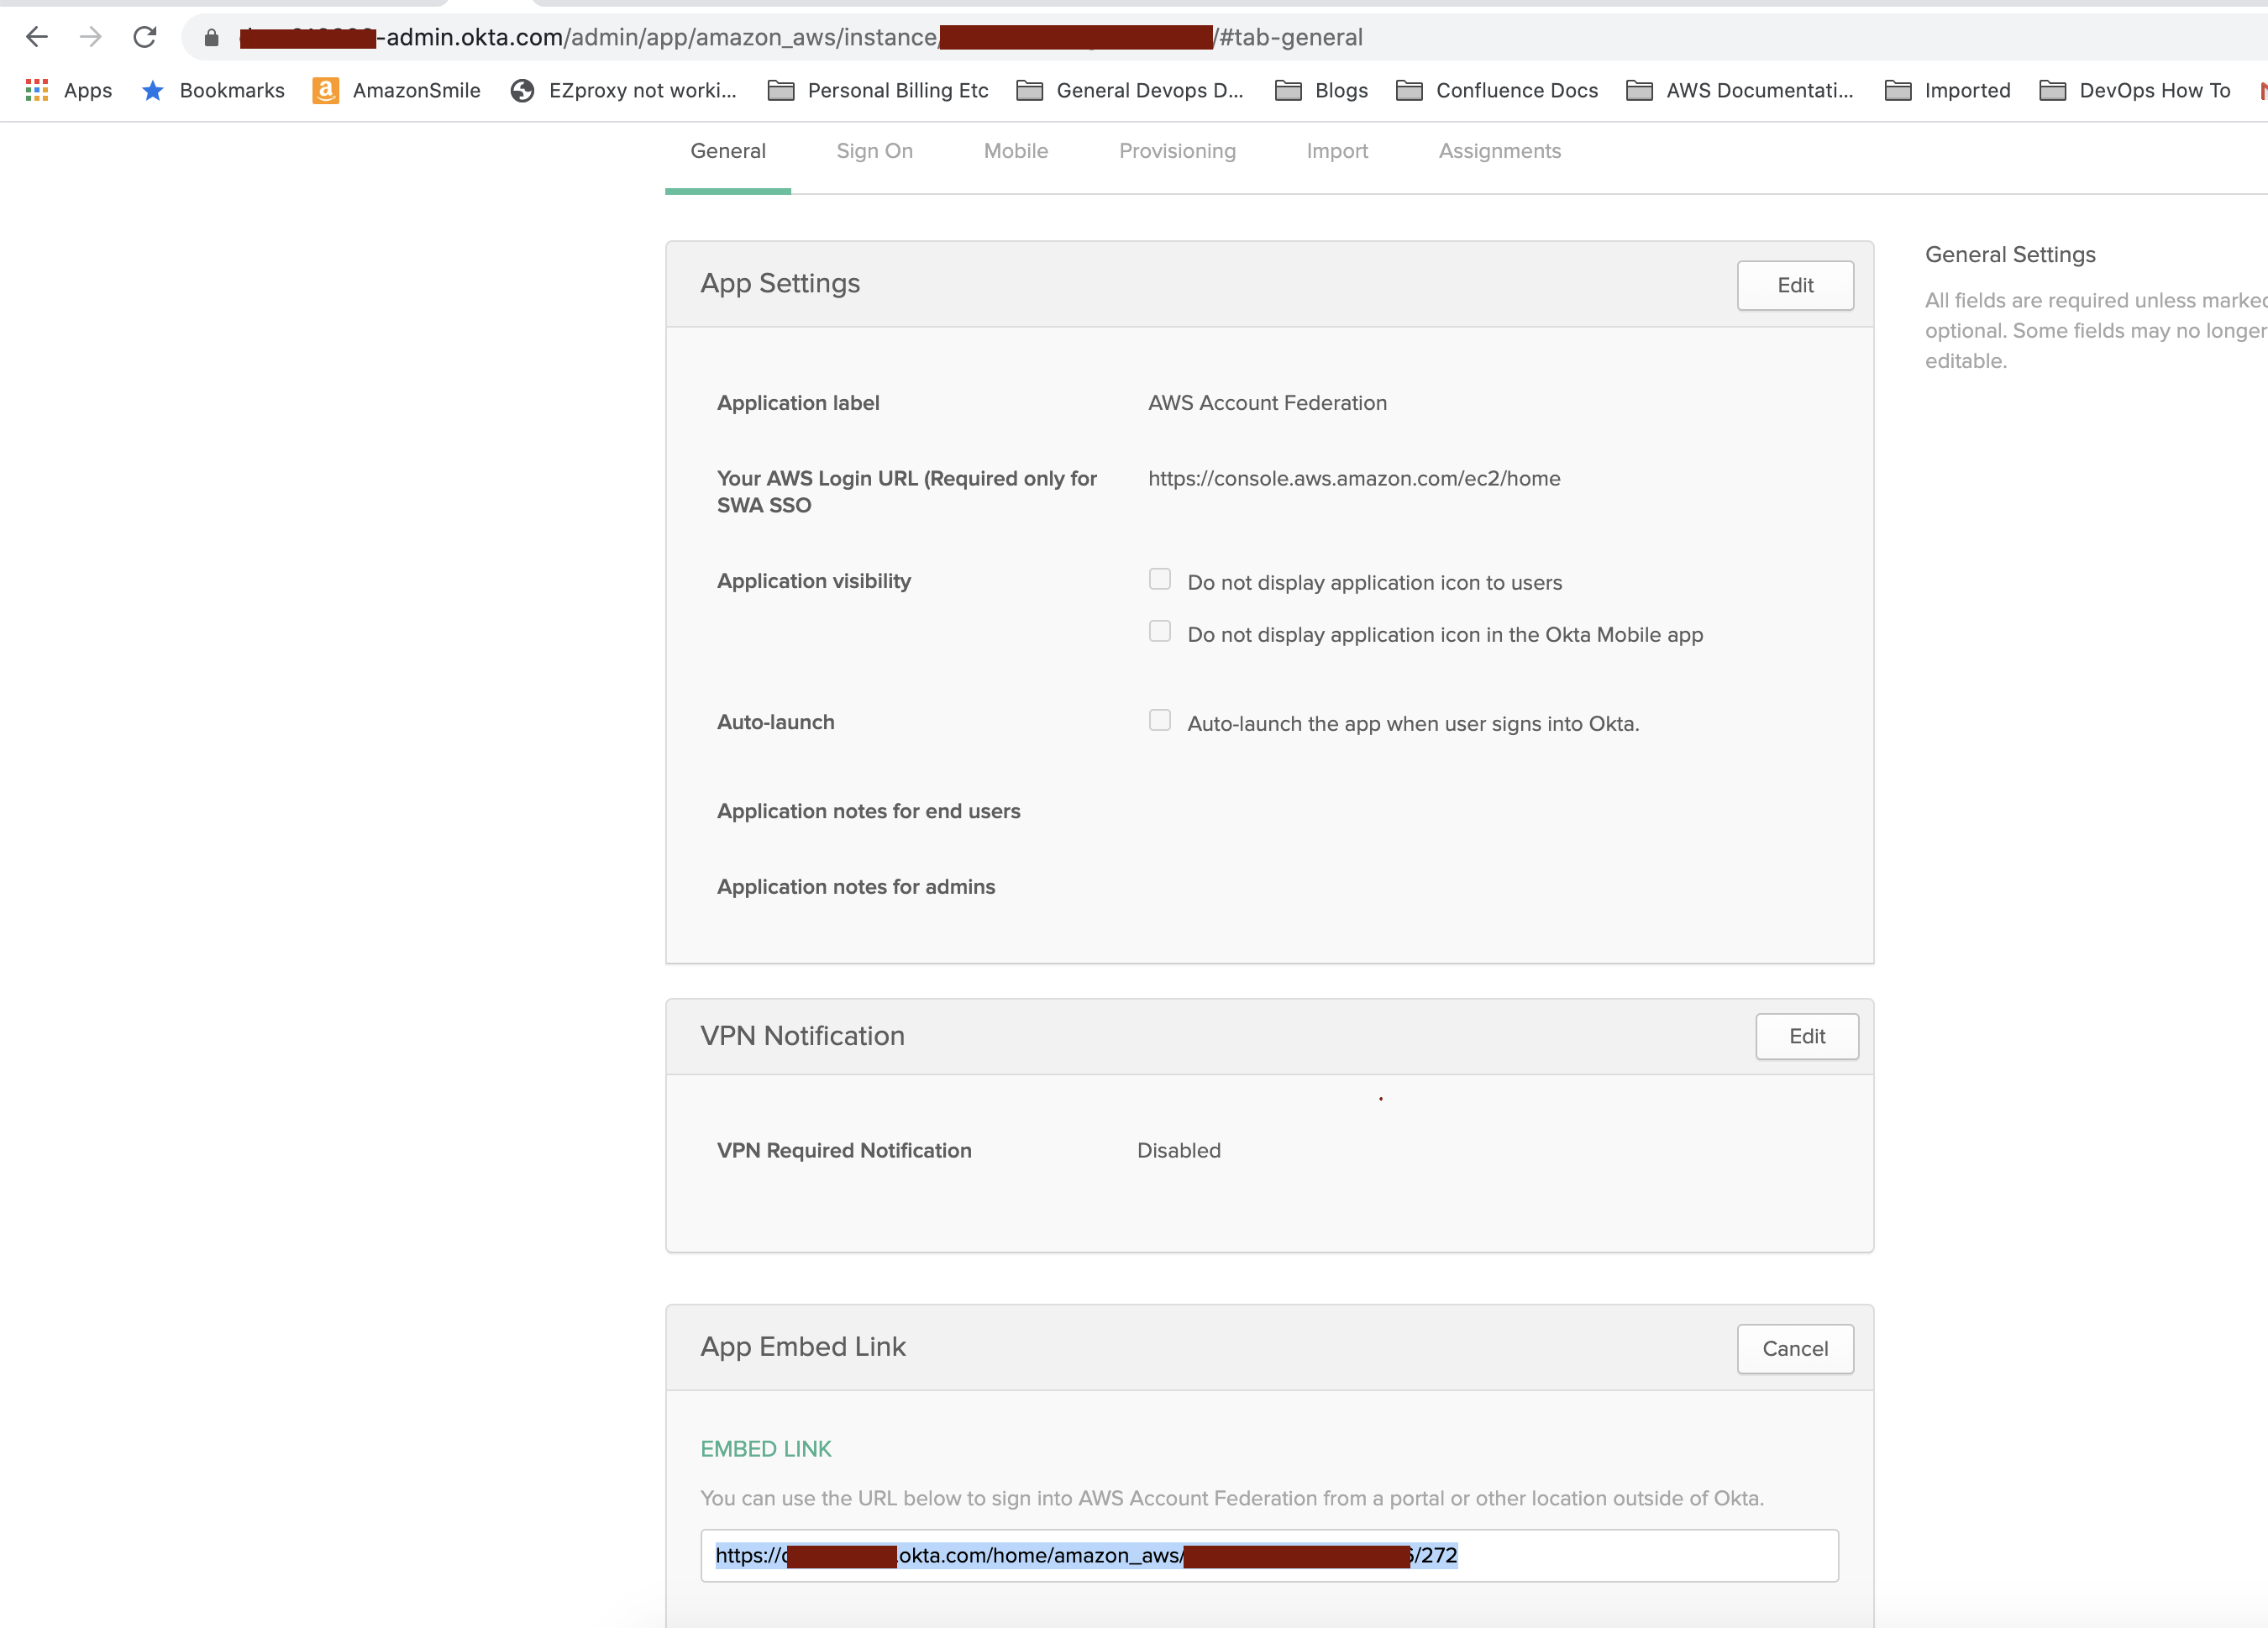
Open your AWS Account Federation application. Under the General Tab, find the App Embed Link. Copy it and set it aside, you will need it later.
Step 3: Configure Figgy#
To prepare Figgy for deployment you're going to need to these files:
Files are located in figgy/terraform/ directory.
- 00_main.tf
- 01_configure_figgy.tf
- vars/{env}.tfvars files
Configure Terraform#
Starting with: 00_main.tf
If you have any familiarity with Terraform this should be a cinch. All you need to do is configure this file as you normally would any other Terraform AWS provider. One important distinction is that this code base is a Terraform multi-environment codebase. You will be using this same Terraform configuration to deploy Figgy Cloud to every AWS account you want to integrate with Figgy. Keep that in mind -- hard-coding a single profile or access key is probably not a good idea.
Once your main.tf is configured you should be able to do something like this:
terraform init
terraform workspace new dev
terraform workspace select dev
These commands might differ slightly depending on your selected Terraform configurations.
Configure Figgy#
Working on: 01_configure_figgy.tf
Open up your 01_configure_figgy.tf file. There are some important options in here. The comments in the file
should make it fairly clear what each option means. If you need more clarity, see our
configuration reference.
Once you have selected your Figgy role types, copy those types and set them aside:
Default role types are these. You may choose as many or few as makes sense to you.
role_types = ["devops", "data", "dba", "sre", "dev"]
Don't forget to set:
auth_type = "okta"
Next, look in your vars/ directory. There are some *.tfvars files in this directory that can serve as a template.
You will need 1 var file configured for each account you wish to integrate with Figgy. If you are using Terraform Cloud or
remote variable storage, you will not need these files and will know what to do here.
Don't forget to set create_deploy_bucket = false in 01_configure_figgy.tf, if you're using your own bucket. You will want to put the appropriate bucket name in each of the vars/* files for each account.
env_alias:
This is the environment name users will be referencing your account by when running commands like
figgy config get --env dev, so it's a good idea to select short aliases for each environment.
webhook_url is optional, but if you want you can add a Slack webhook url where Figgy can post notifications for configuration changes.
You may want to rename some of these files so they appropriately match your selected environment names.
Step 4: Deploy Figgy#
The order you deploy these configurations to each account does not matter, but for the sake of this walk-through lets start
with the dev environment.
You'll want to run terraform apply for each environment. Each environment is associated with a vars/env-name.tfvars file.
Here's what a workflow would look like:
terraform init
terraform workspace new dev
terraform workspace select dev
terraform apply -var-file=vars/dev.tfvars
terraform workspace new qa
terraform workspace select qa
terraform plan -var-file=vars/qa.tfvars
terraform apply -var-file=vars/qa.tfvars
terraform workspace new stage
terraform workspace select stage
terraform plan -var-file=vars/stage.tfvars
terraform apply -var-file=vars/stage.tfvars
You get the drift!
For each deployed account, you will see a new "Identity Provider" show up with the name of 'okta':
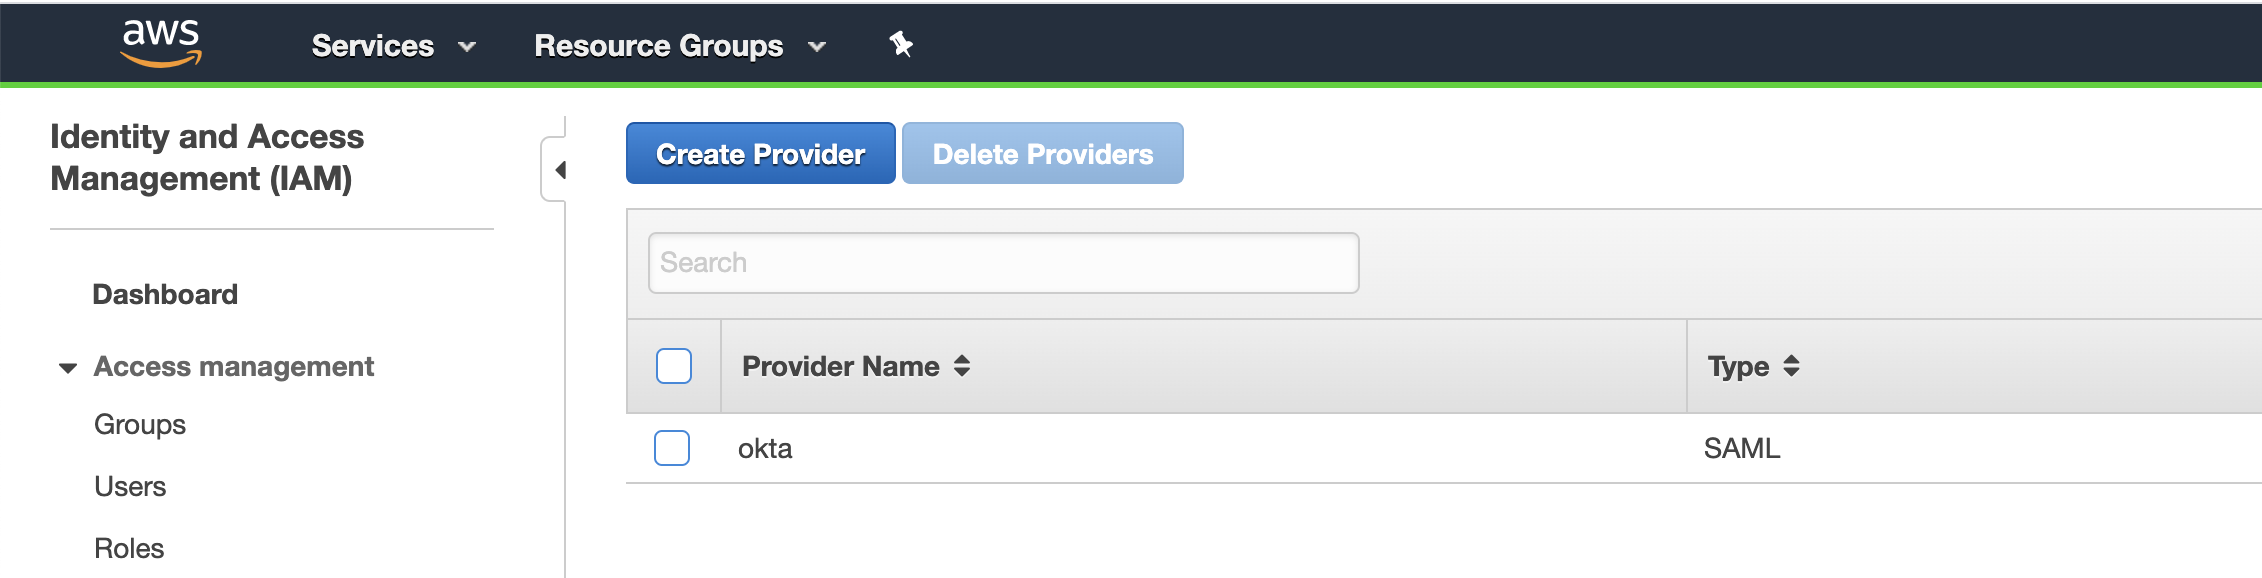
This establishes a trust with OKTA based on that metadata file you downloaded.
We're almost done, now we just need to tell OKTA who should have access to what! :)
Step 5: Enable OKTA API Integration#
During the last step, Figgy provisioned a user in each account named figgy-oktaSSOUser. This user is required by the OKTA
AWS Account Federation app.
- Log in to one of these accounts and find this user.
- Generate an AWS Access Key / Secret Access Key. Hold on to these.
- Open up your
AWS Account Federationapp in OKTA.- Select the
Provisioningtab - Check the
Enable API Integrationcheck-box. - Enter the Access Key / Secret Key you just received.
- Click Test integration.
- Under the
Provisioningtab, underTo App, enable "Create Users" & "Update User Attributes"
- Select the

Step 6: Configure Groups#
The following steps may vary depending on how you have OKTA configured as your IDP. If you are using OKTA to manage your users and groups and do not use something like Active Directory, then the following steps will work fine. Otherwise, you may need to perform these steps in Active Directory instead.
If you get stuck, reference these OKTA Docs
For the following steps, we are assuming you are using OKTA managed groups/users.
Fair warning, this might be a bit tedious if you have a lot of AWS accounts, but once it's done it will be easy to maintain. If you get annoyed or demotivated, you aren't alone.. I've had to write the same figgy deployment guide 3 times over now -- one for each auth type.
- First collect a list of associated AWS account ids for accounts you just deployed Figgy Cloud to, and their associated environment aliases.
- Next, retrieve your list of roles I asked you to set aside earlier.
For instance, suppose you have these these accounts and roles.
| Account Id | Run Environment | Role Name |
|---|---|---|
| 1111111111 | dev | devops |
| 1111111111 | dev | dba |
| 1111111111 | dev | dev |
| 2222222222 | stage | devops |
| 2222222222 | stage | dba |
| 2222222222 | stage | dev |
| 3333333333 | prod | devops |
| 3333333333 | prod | dba |
| 3333333333 | prod | dev |
You will need to create a group for each row in this table. So you will have Accounts * Roles groups in your OKTA directory. Adding any OKTA user to one of these groups will automatically grant them access AWS in the associated account with with the matching IAM role.
- Open up OKTA -> Directory -> Groups
- Click Add Group
- Name the group:
aws_${ACCOUNT_ID}_figgy-{ENVIRONMENT_NAME}-{ROLE_NAME}- So for our first example above:
- Group Name:
aws_1111111111_figgy-dev-devops
So from the above example I would have to create these groups:
aws_1111111111_figgy-dev-devops
aws_1111111111_figgy-dev-dba
aws_1111111111_figgy-dev-dev
aws_2222222222_figgy-dev-devops
aws_2222222222_figgy-dev-dba
aws_2222222222_figgy-dev-dev
aws_3333333333_figgy-dev-devops
aws_3333333333_figgy-dev-dba
aws_3333333333_figgy-dev-dev
After you have created these groups, add your user to a few of these groups, preferably all groups for at least 1 role.
Almost there - yeah it's hell, we're in it together though#
- Go back and open
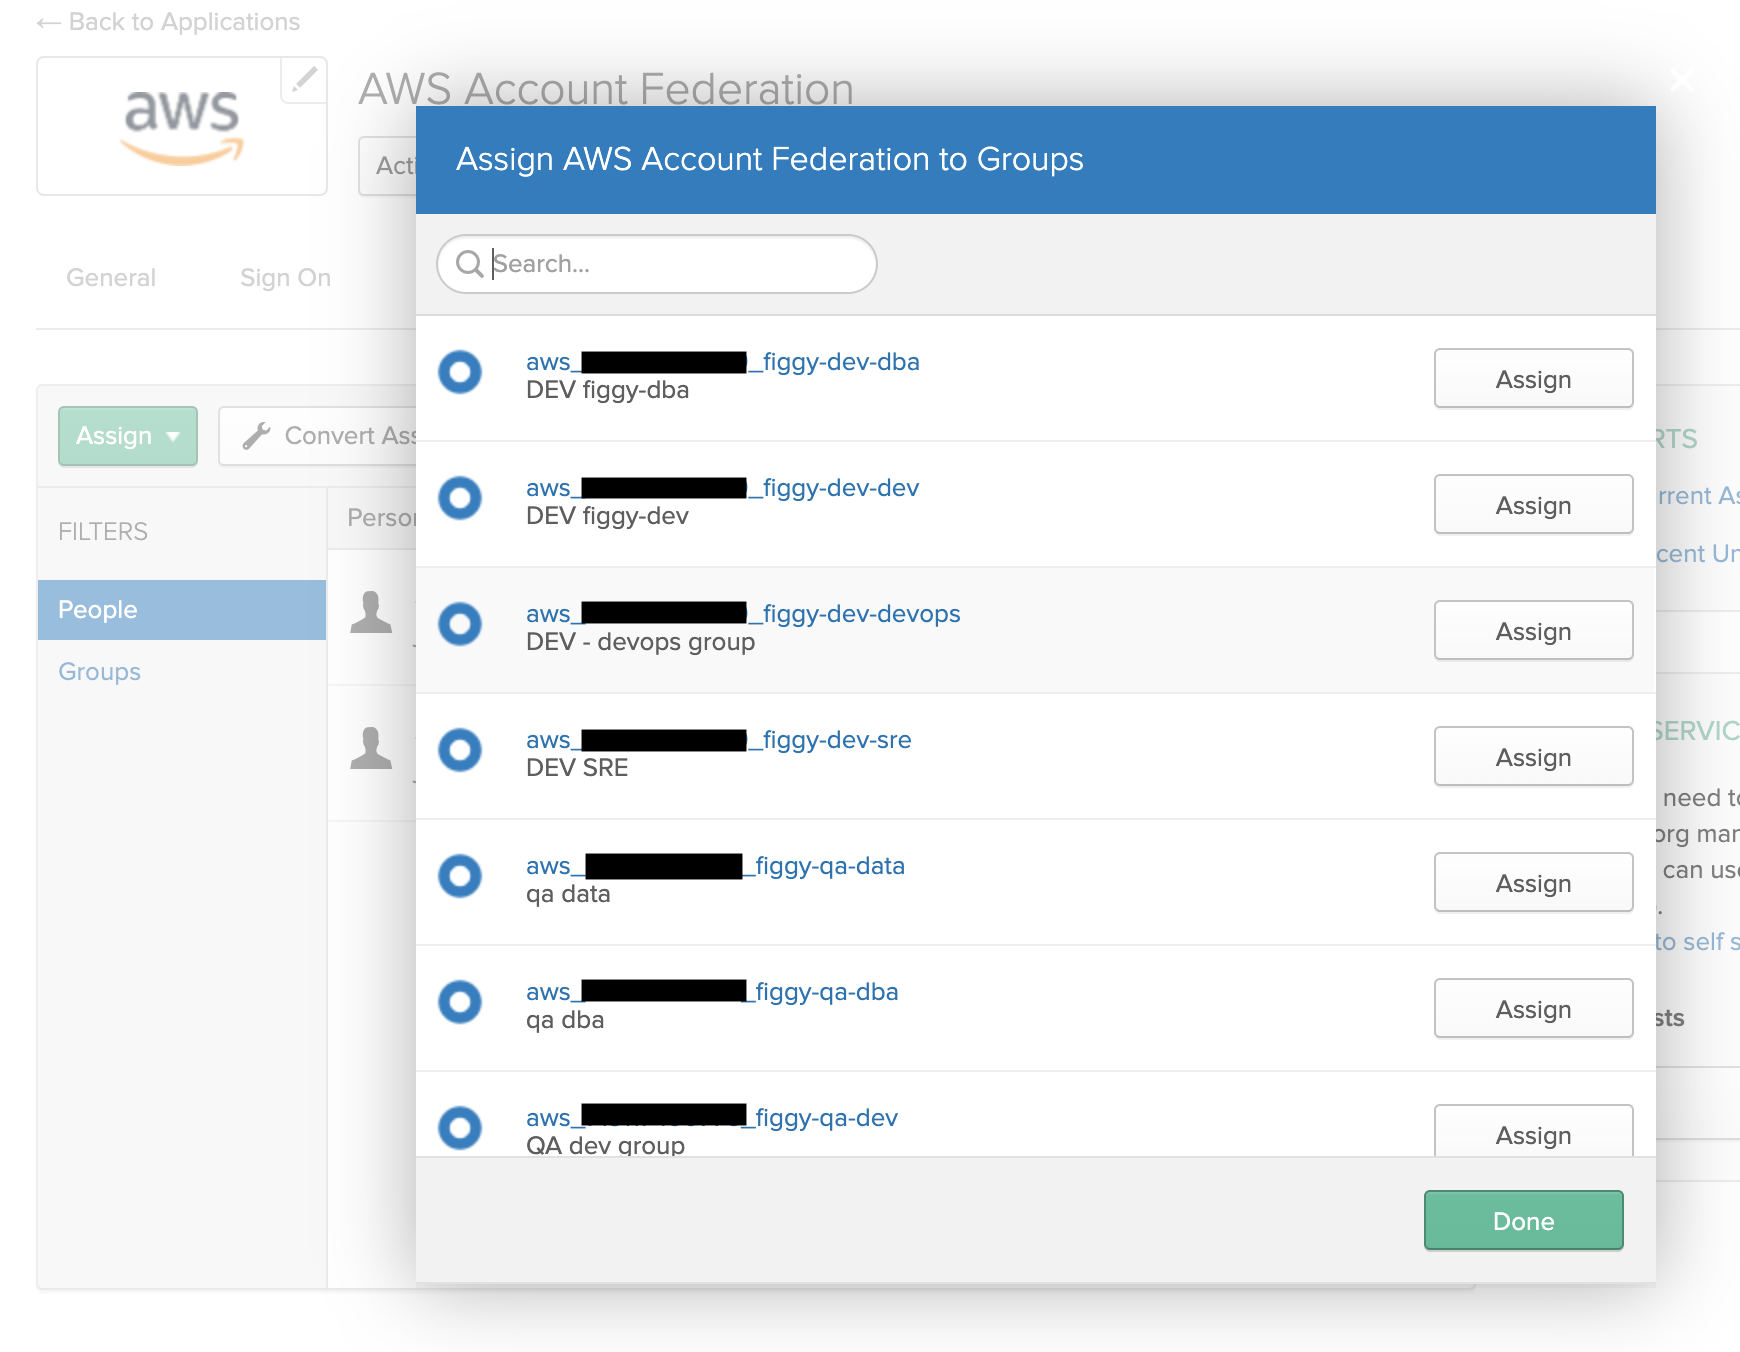
AWS Account Federationapplication you created under OKTA -> Applications. -
Under the
Assignmentstab select Assign -> Assign To Groups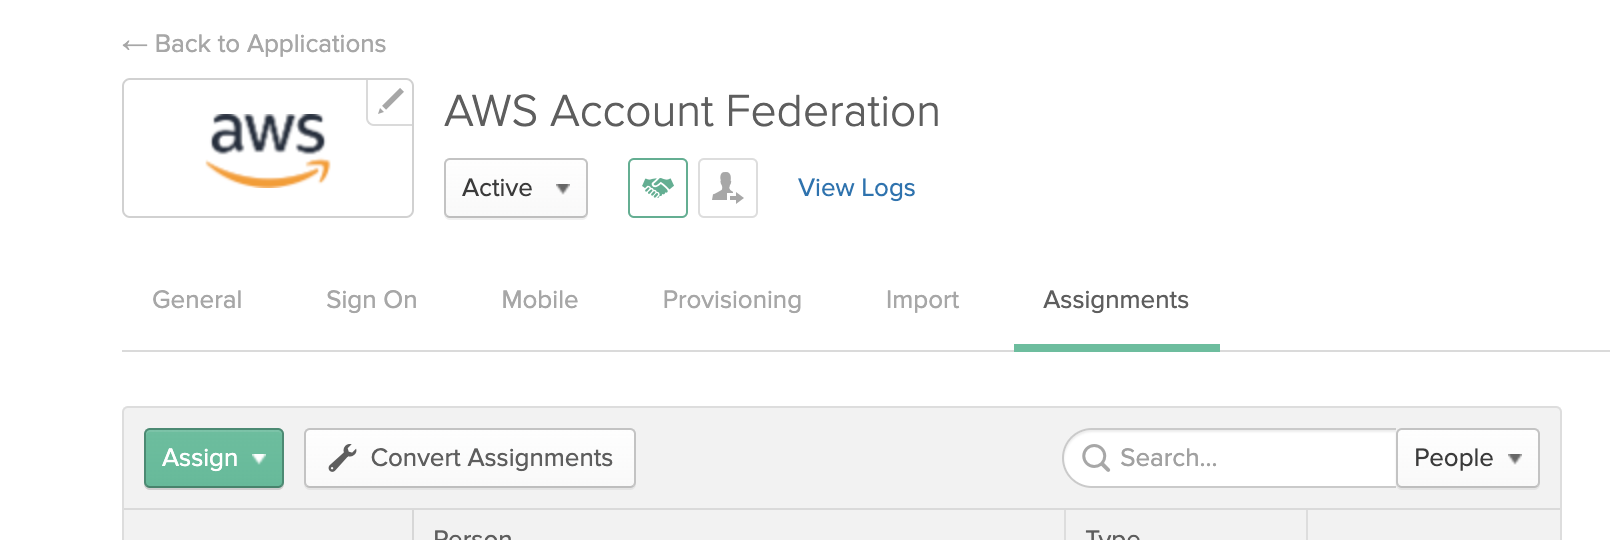
-
Scroll down and assign ALL the groups you just created.
Step 7: Test#
First, lets make sure you are able to assume into AWS through a web browser. Log-in to OKTA as the user you just gave access through groups a few minutes ago.
Under OKTA apps you should see AWS Account Federation:
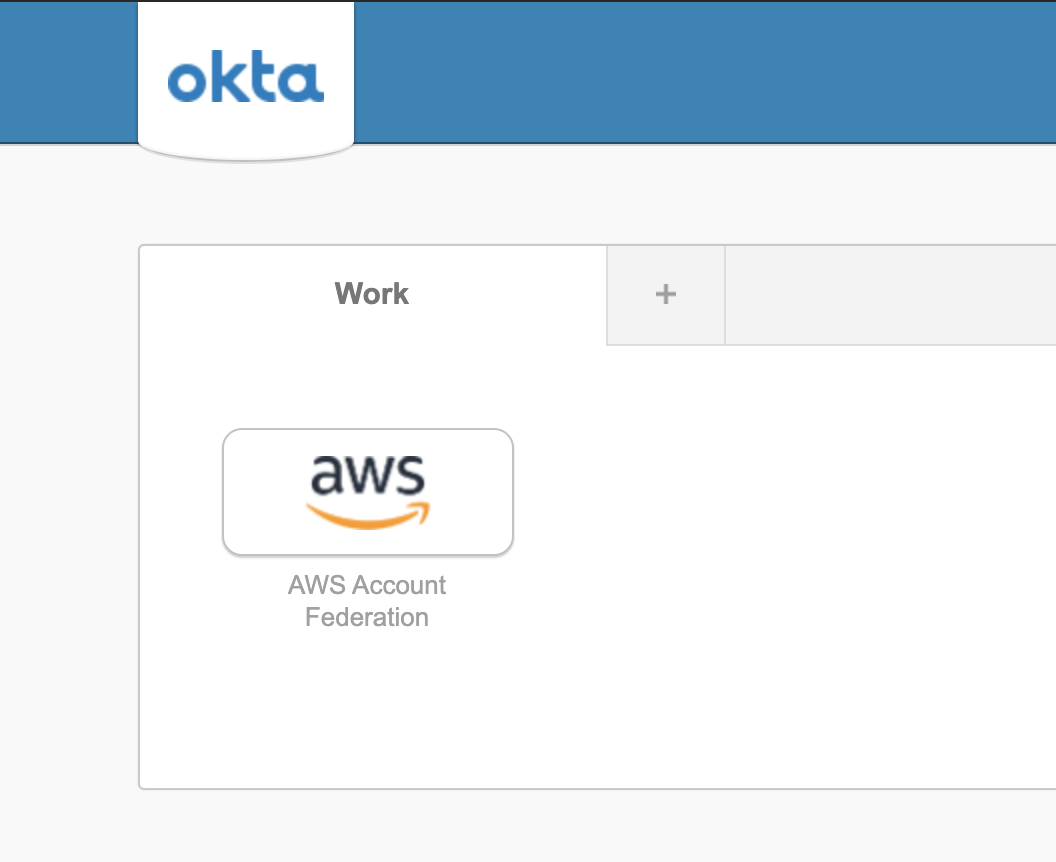
When you select that app, you should see a list of accounts you can sign-in to.
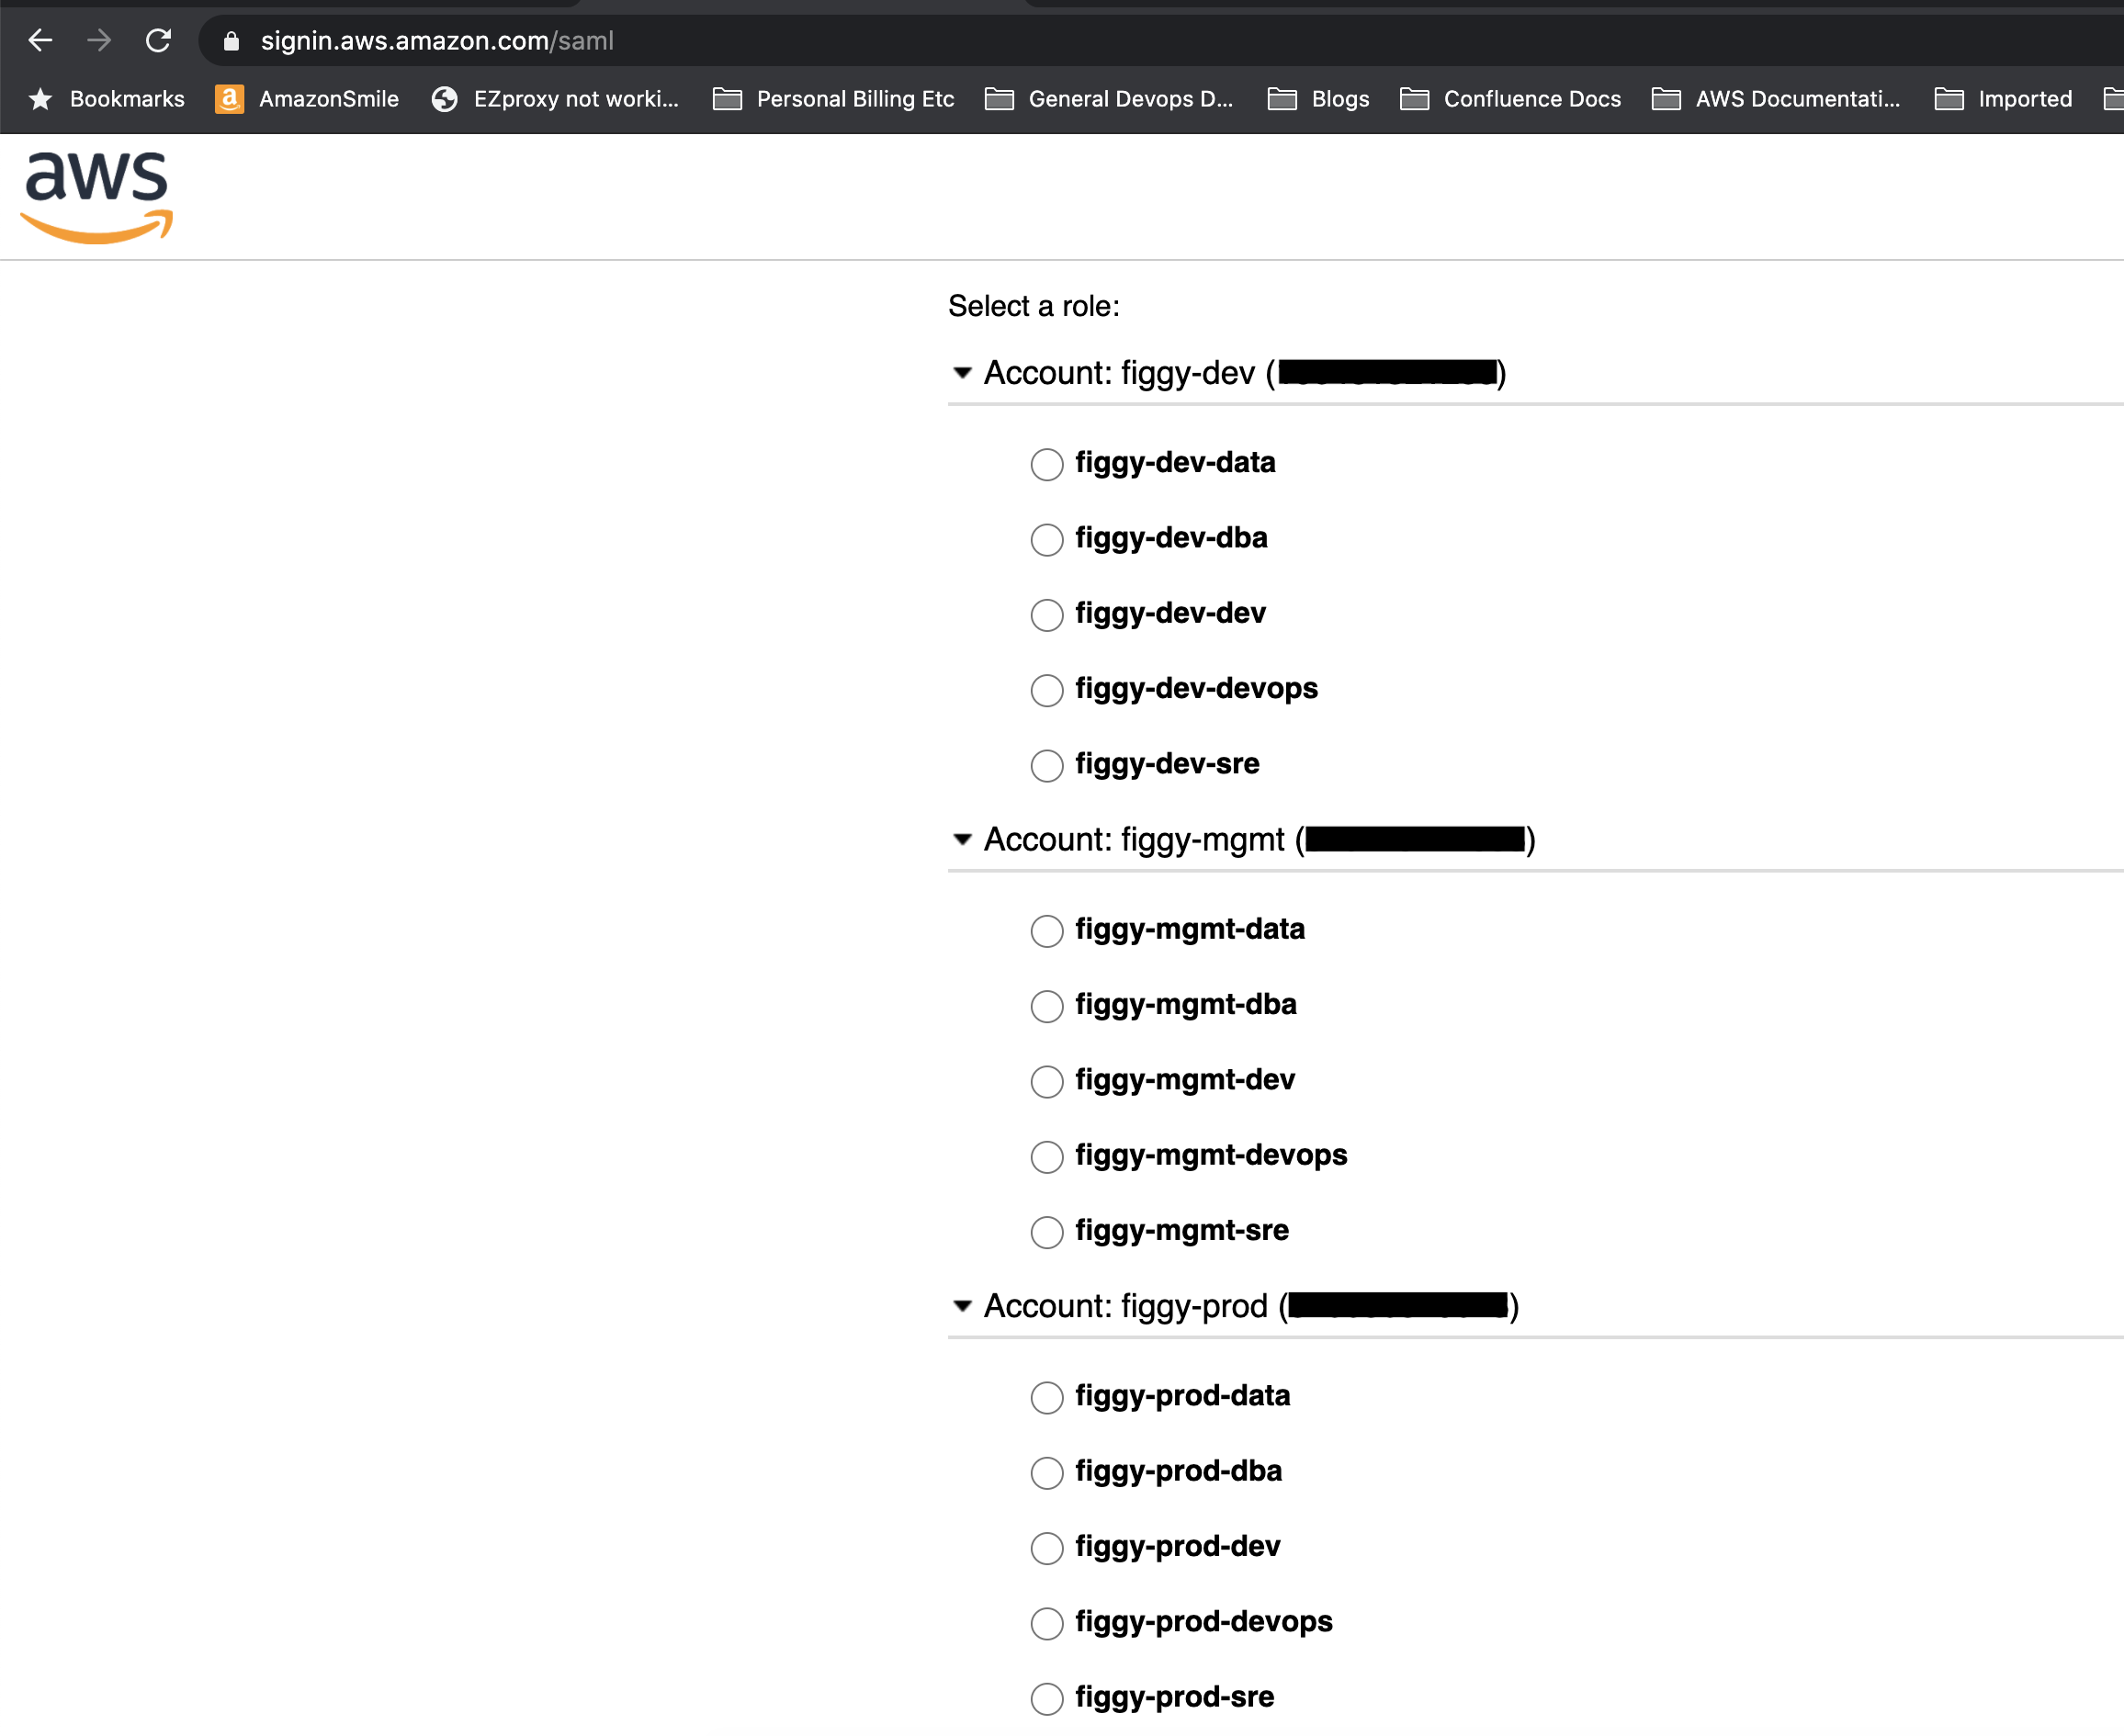
Attempt to sign into the AWS console through one of these roles. If you are successful and do not receive a SAML exception back then you have successfully configured your Federated access!
Step 8: Configure Figgy CLI#
Prep:
- Make sure you have the Figgy CLI installed locally.
- A while ago I asked you to save your OKTA App Embed URL. Get that handy.
Configure:
figgy --configure
When running configure you will be prompted to input the OKTA Embed link, be sure to enter the link you copied earlier.
If you lost it, you can find it under your application's General tab under App Embed Link.
If you enter your MFA (or don't) and then see the list of your environments and your user's associated roles then you are GRAVY! Celebrate!
...

Please input the MFA associated with your user: 258915

The following roles were detected for user: jordan@figgy.dev - if something is missing, contact your system administrator.

+------------------+---------------+-----------------------------+
| Account #        | Environment   | Roles                       |
+==================+===============+=============================+
| 10648 [REDACTED] | dev           | data, dba, dev, devops, sre |
+------------------+---------------+-----------------------------+
| 71311 [REDACTED] | qa            | data, dba, dev, devops, sre |
+------------------+---------------+-----------------------------+
| 75007 [REDACTED] | stage         | data, dba, dev, devops, sre |
+------------------+---------------+-----------------------------+
| 81621 [REDACTED] | mgmt          | data, dba, dev, devops, sre |
+------------------+---------------+-----------------------------+
| 81663 [REDACTED] | prod          | data, dba, dev, devops, sre |
+------------------+---------------+-----------------------------+
What type of user are you? Options are: ['dba', 'data', 'dev', 'devops', 'sre']:
 -> devops

Please select a default account. All commands without the specified `--env` parameter will run against this account.
 Options are: ['mgmt', 'dev', 'stage', 'qa', 'prod']:
 -> dev

...
After configuring, test the CLI is working by running:
figgy config get
Roll it out to more people#
Now that you have your App Embed Link, you can set it in a generic Figgy config file and distribute it to all of your users. This will save them the trouble of having to manage this url themselves.
To do this: See Distributing Figgy